I should have posted this right after I originally created this site, but I wanted to spend some time ironing out any issues first. This way, this document is somewhat more complete. My motivation in creating this site was that I wanted a place to host various projects and other things that I thought were interesting and cool. Also I wanted to have much more control than what any of the hosting site had out there.
Initially I thought about making my own everything using a few key Javascript frameworks. Then I thought about using Bootstrap for web infrastructure. Finally I settled on using WordPress since:
- I am more concerned with the content than the form of the site. Sure, bootstrap can make a slicker site, but I would rather spend my time on other interesting projects
- WordPress is a fairly mature project so a lot of bugs should be solved or non-existent. Also if there is an issue, there is a solid community which can help solve any such problems.
- Also WordPress is fairly feature rich where there are a lot of different plug-ins and themes readily available for free. Another nice feature is that it has code to make your site display differently depending on the user client (such as desktops, tablets, and mobile).
Instead of using a hosting site or hosting it on my home computer, I am using Google Cloud since:
- Using a very simple setup is free, or at least has been free for the past few months.
- Google has some powerful machines and technologies on the back end; that is better than anything that I own and you can pretty much guarantee that their system will be up and running 24/7
- Google cloud provides a variety of different services, however a lot of them are geared towards larger scale enterprise deployment.
The purpose of this document is to summarize the key details about making a WordPress site on Google Cloud Services. Some of it is my own knowledge, while the rest is a combination of various other sources of which their original links have been lost.
Standard Disclaimer…
There are many steps and each one many change for a variety of reasons: such as changing software versions, code repositories, and other technologies. Basically, your mileage may vary with all the steps below, so be warned that things may not work exactly and certain steps may need to be slightly tweaked.
Prerequisite…
One needs a google account; so if you have a gmail account you are set.
Creating a Virtual Machine
First, one needs to navigate to cloud.google.com to be able to process with all of the following steps.
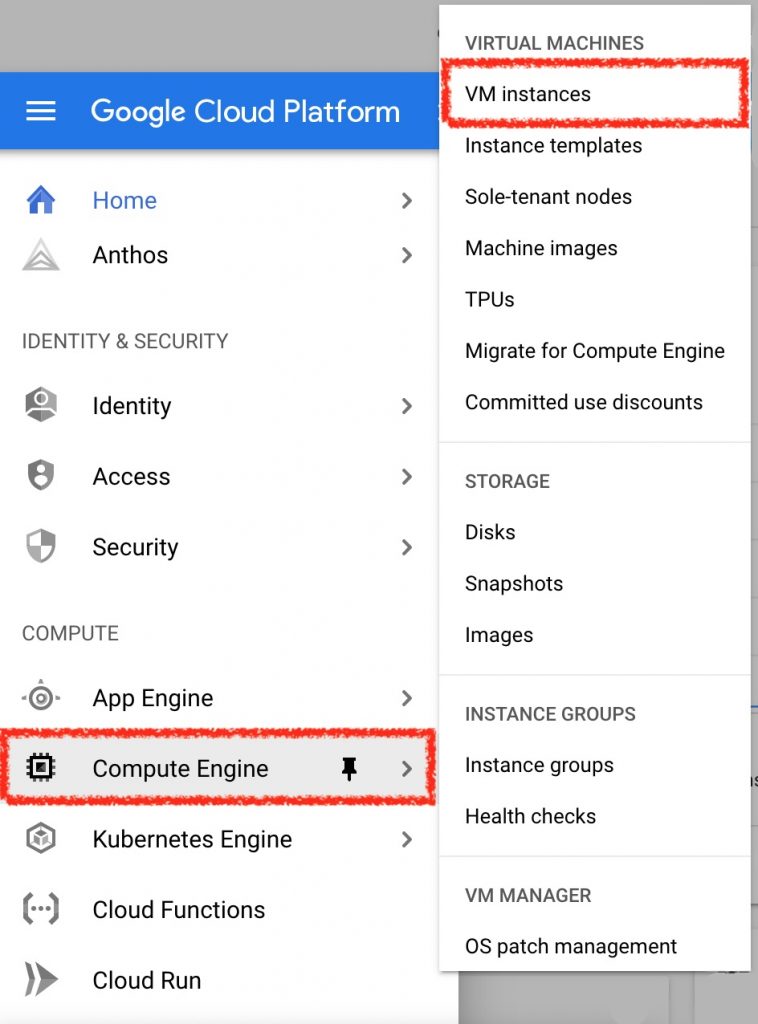
To create a virtual machine (or VM), we need go to the console either by clicking on the button in the top right hand corner (or navigating to https://console.cloud.google.com/). Then select VM instance from the Compute Engine section in the side menu (as seen in the image below).
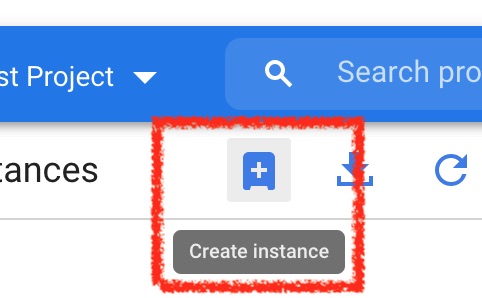
On the next page, select Create instance from the top VM instances panel bar…
Then on the Create instance page, the following options should be set (while the default values can be used for the rest)…
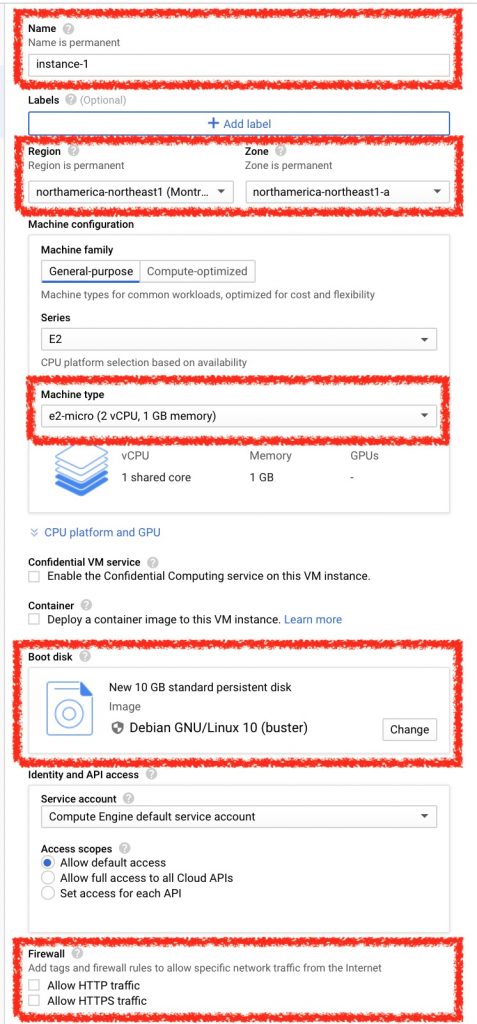
An identifier for the VM needs to be specified in the name field; for example it can be simple called wordpress or mywebsite.
In the region and zone section, the region specifies the data center (or geographical location) where the site is hosted is selected. The zone specifies the ‘isolated location’ within a region. In the past, I have selected northamerica-northeast1 (Montréal) for the region and northamerica-northeast1-a for the zone.
Since our website is personal and fairly simple, then in the Machine type field we select the smallest possible machine to reduce any costs and resource usage. Therefore the e2-micro instance (2 vCPU, 1 GB memory) was selected.
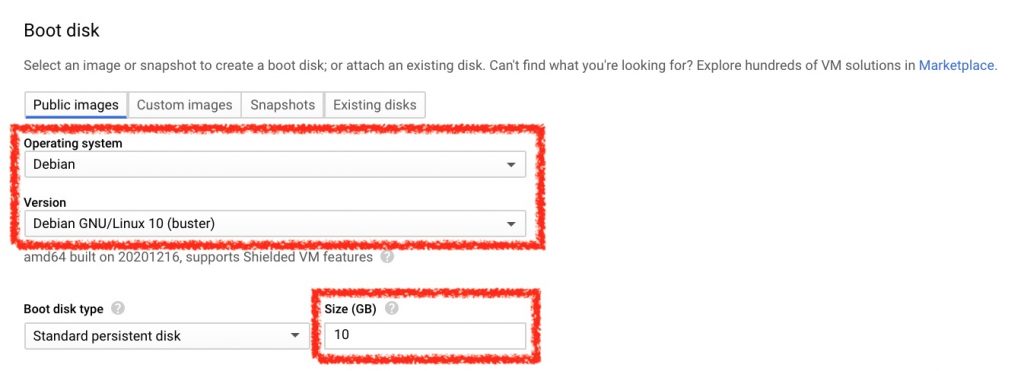
In the Boot disk section, for the operating system Ubuntu is usually selected, and for the version an Ubuntu LTS variant (usually the first one available) is selected. Note that any particular Linux can be selected, however the remaining instructions have been based upon Ubuntu 16.04 LTS (which might be slightly old when someone is reading this in the future but the core elements are the same or very similar). Next the Size was doubled to 20 Gb.
Back on the VM settings page, in the Firewall section since we need to select both Allow HTTP traffic and Allow HTTPS traffic since we are creating a website.
Once everything has been set, the Create button is clicked to build the new machine. Note that there is a bit of work that happens on the back end and this process can take a few minutes to be performed.
Interacting with the new VM…
Next we need to connect to the new VM and continue the setup. Now in the VM instances page the new VM should be listed as shown below. Perhaps it was a bit naive of me to black out the IP address…
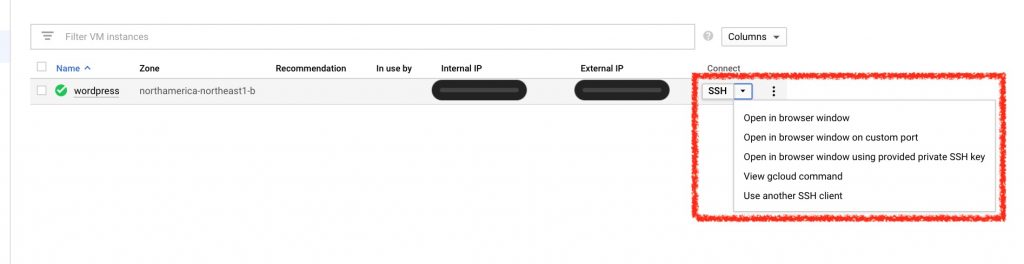
From the above pic, it can be noticed that there are multiple ways to connect to a VM, however we shall focus on two of them: web based SSH and Google’s gCloud tools.
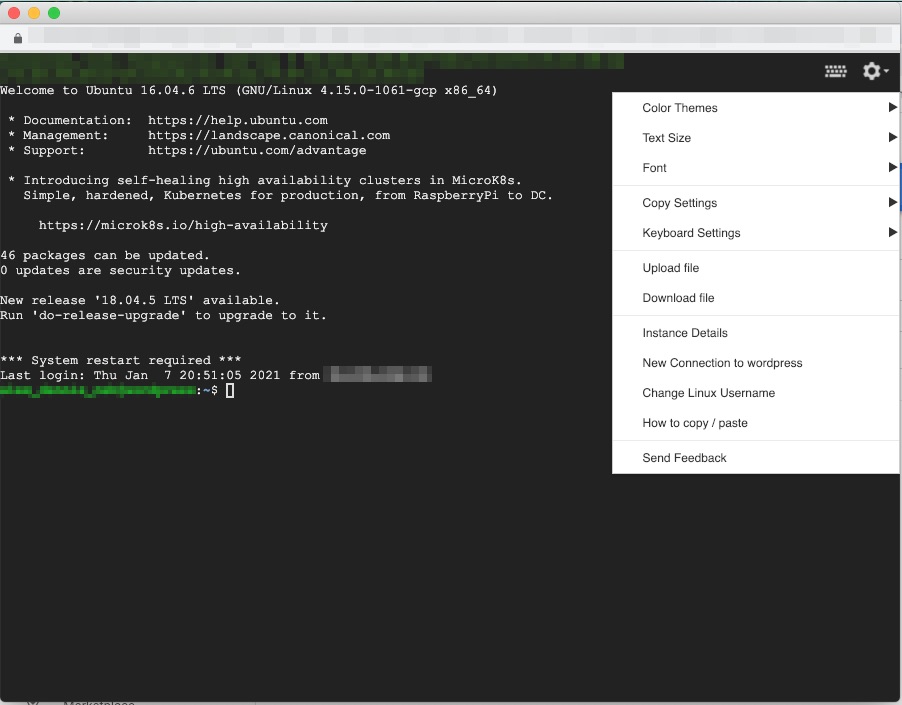
Web based SSH…
The default behaviour when clicking on the connect button is to launch a SSH session within a separate browser window. In the top right corner of the window the gear icon displays the following menu. From this it is possible to upload/download files one at a time to the VM.
gCloud Tools…
Google’s Cloud SDK makes it possible to interact with VM instances easily from the terminal window. All commands are in the form of a gCloud command. The appropriate gCloud command can be copied from the connect menu and then used repeatedly in the future.
Additional Linux Setup…
Once connected to the new VM a few additional Linux setup items need to be performed. First, the installed software needs needs to be updated and upgraded with the following command:
> sudo apt update && sudo apt upgradeNext the swap file needs to be created and appropriately updated. The one problem with choosing a machine of the type e2-micro is that is does not have a swap file activate by default. Therefore the following commands create, initialize (or null out), secure it (or make it readable only by root), format it (by mkswap), and finally use it.
> sudo fallocate -l 1G /swapfile
> sudo dd if=/dev/zero of=/swapfile bs=1024 count=1048576
> sudo chmod 600 /swapfile
> sudo mkswap /swapfile
> sudo swapon /swapfile
To make sure that the swap starts when the VM starts up, the following line needs to be added to /etc/fstab. Note that the entries correspond to the path the device, mounting directory, filesystem type, mount options, dump (used by a backup program), and to be excluded by fsck.
- depending on the version installed either this line -
/swapfile swap swap defaults 0 0

- or this one are needed -
/swapfile none swap sw 0 0
To verify if the change was ok, we can run the following:
> sudo mount -a Domain Name Setup…
First we should note that this step can be considered optional. The site will work and be accessible with just an IP address which is fine for some people, or if the site is accessed with a link. Next there are dynamic IP DNS services that are free for personal use out there.
Anyways, if a domain name is being used, we first need to find a clever one and register it. There are a lot of domain registration companies out there like these: [1], [2], and [3]. Note that quite often a pretty obscure name can cost a few dollars a year.
Next the IP address of the VM needs to be determined. From the VM instance page it can be looked up or by using the following command within a SSH shell:
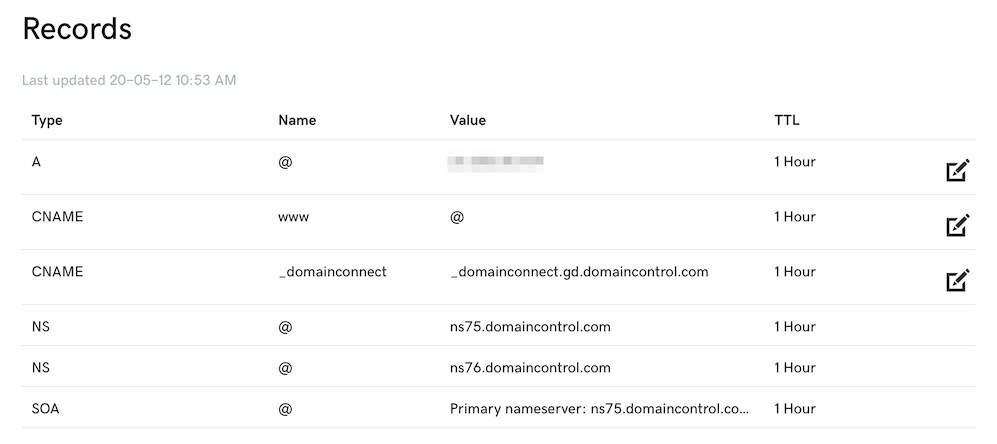
> curl ifconfig.meThen on the domain registrar’s site, the A record for that particular domain needs to be changed to reference the previously found IP address (as shown below). Note that for all of the other entries, the default values should be used.
Also note that the process of modifying something on the domain registrar can take a few hours to propagate to all of the various servers out there.
Configuring and Installing the LAMP Stack…
From Wikipedia:
LAMP (Linux, Apache, MySQL, PHP/Perl/Python) is a very common example of a web servicestack, named as an acronym of the names of its original four open-source components: the Linuxoperating system, the Apache HTTP Server, the MySQL relational database management system(RDBMS), and the PHP programming language. The LAMP components are largely interchangeable and not limited to the original selection. As a solution stack, LAMP is suitable for building dynamic web sites and web applications.
Therefore by the above definition, WordPress is a LAMP application, so we need to install the remaining elements, that is Apache, MySQL, and PHP. We are using the tasksel tool to install multiple packages (note that according to some it is deprecated).
> sudo apt install tasksel
> sudo tasksel install lamp-server
Note that lamp-server does not install everything. A few extra packages also need to be installed:
> sudo apt install php-curl php-gd php-mbstring php-xml php-xmlrpcApache (Websever) Configuration…
In /etc/apache2/sites-available/ we need to make a new version of the default configuration for our site, that is (note that the name NEW_SITE is just a placeholder):
> cd /etc/apache2/sites-available/
> sudo cp 000-default.conf NEW_SITE.conf
In NEW_SITE.conf the following changes need to be made…
<Directory /var/www/html>
        Require all granted
</Directory>

<VirtualHost *:80>
        ServerName  <REGISTERED_DOMAIN_NAME>
        ServerAlias www.<REGISTERED_DOMAIN_NAME>
        DocumentRoot /var/www/html
</VirtualHost>
Then to make sure that the above changes work, we need to create the DocumentRoot directory, disable the old configuration (using a2dissite), enable the new one (using a2ensite), and finally reload webserver (using systemctrl).
> sudo mkdir /var/www/html
> sudo a2dissite default.conf
> sudo a2ensite NEW_SITE.conf
> sudo systemctrl reload apache2
Again, depending on the distribution used, to restart apache the following might need to be used:
> sudo /etc/init.d/apache2 restart

- or -

> sudo /etc/init.d/apache2 stop
> sudo /etc/init.d/apache2 start
MySQL (Database) Configuration…
So the majority of the WordPress data stored in a database, so that it is possible to quickly search for any information. Note that binary files such a images and videos are not stored in the database (rather references to these files are). While there are many different database solutions out there, mySQL is used since it is good enough for small and personal websites.
Therefore, we need to create a database within mySQL with the following settings. Note that WORDPRESS_DB, WORDPRESS_USER and GOOD_PASSWORD are placeholders for something better or more meaningful.
> sudo mysql -u root
> CREATE DATABASE WORDPRESS_DB;
> GRANT ALL ON WORDPRESS_DB.* TO 'WORDPRESS_USER' IDENTIFIED BY 'GOOD_PASSWORD';
> quit
Finally, we need to run mysql_secure_installation and say yes to everything…
> sudo mysql_secure_installationPHP configuration…
PHP is a server scripting language which is what WordPress (and its pluggins) is written in. The default is settings are fine for the majority of the parameters. However it is recommended to increase the max upload size and reduce the input time. Therefore the file /etc/php/<version>/apache2/php.ini needs to be modified with the following changes (where version is something like 7.2 or 7.4):
max_input_time = 30
upload_max_filesize = 20M
post_max_size = 21M
WordPress Setup…
Finally, WordPress can be installed and setup. First we need to download it:
> cd /var/www/html
> sudo wget https://wordpress.org/latest.tar.gz
> sudo tar -xzvf latest.tar.gz
Note that we may have to move the files up one directory (using mv wordpress/* .). Next we need to modify wp-config.php with the required database information (note that wp-config-sample.php may need to be copied for this). The key changes are:
define( 'DB_NAME', 'WORDPRESS_DB' );
define( 'DB_USER', 'WORDPRESS_USER' );
define( 'DB_PASSWORD', 'GOOD_PASSWORD' );
Also in wp-config.php, we need to change the authentication keys and salts. There is a handy link (https://api.wordpress.org/secret-key/1.1/salt/) that can generate unique codes for all of these (that is for AUTH_KEY, SECURE_AUTH_KEY, LOGGED_IN_KEY, AUTH_SALT, SERCURE_AUTH_SALT, LOGGED_IN_SALT, NONCE_SALT)
Now it is possible to finish the setup. In a web browser, we can navigate to the VM (either to the domain or the folder where wordpress was extracted to), and complete the installation:

Finally, to improve performance and stability a very popular script to run is apache2buddy. It tweaks a few settings particularly: PHP memory limits, Memcache, MaxClients, memory usage, and worker threads. It is available here.
WordPress Themes
There are a lot of nice existing WordPress themes out there and most are free, however there are a lot of that are commercial products. These are more geared towards those who want to make a more serious site such as with a small business or with marketing a particular product. There are free versions of the commercial themes where most of the key features are missing or disabled but a lot the nicer design elements are still present. Also, a theme can be slightly customized with most a the smaller elements (such as font centring and colours).
A theme can either be installed using the WordPress dashboard or just copied and unzipped to the wp-content/themes/ directory. Then within the WordPress dashboard, certain settings can be the modified for the theme.
WordPress Plugins
Plugins are scripts that provide some extra functionality that is not provided by the default WordPress install. Just like with the themes, there are both free and commercial versions of a plugin.
Similar to themes, plugins can be installed through the WordPress dashboard or directly copied into wp-content/plugins/ directory. Note that in order to use the plugin, it needs to be activated through the dashboard.
Some notable plugins:
- pdf-embedder : does what is says, allows to embed PDFs just like images. It includes previous, next, and zoom buttons
- display-post-types : displays pages/posts in a nice grid, list, or even a slider.
- wpforms-lite : easy way to make a form; mainly used for a contact form.
- wp-mail-smtp : tool used to send emails since the default WordPress is dependent on
- katex : the KaTeX WordPress plugin enables you to use the fastest TeX math typesetting engine on your WordPress website
- gallery-custom-links : Gallery Custom Links allows you to link images from galleries to a specified URL
- iframe : WordPress removes iframe html tags because of security reasons. Iframe shortcode is the replacement of the iframe html tag and accepts the same params as iframe html tag does.
Setting up Permalinks…
According to WordPress, permalinks are:
Permalinks are the permanent URLs to your individual weblog posts, as well as categories and other lists of weblog postings. A permalink is what another weblogger will use to link to your article (or section), or how you might send a link to your story in an e-mail message. The URL to each post should be permanent, and never change — hence permalink.
Depending on the version of wordpress being installed, the permalinks might have been set to something undesired (for example the post ID). It is easy to change them to something better, such as the post title. In the settings section on the dashboard, the permalinks style/settings can be changed using the following dialog:
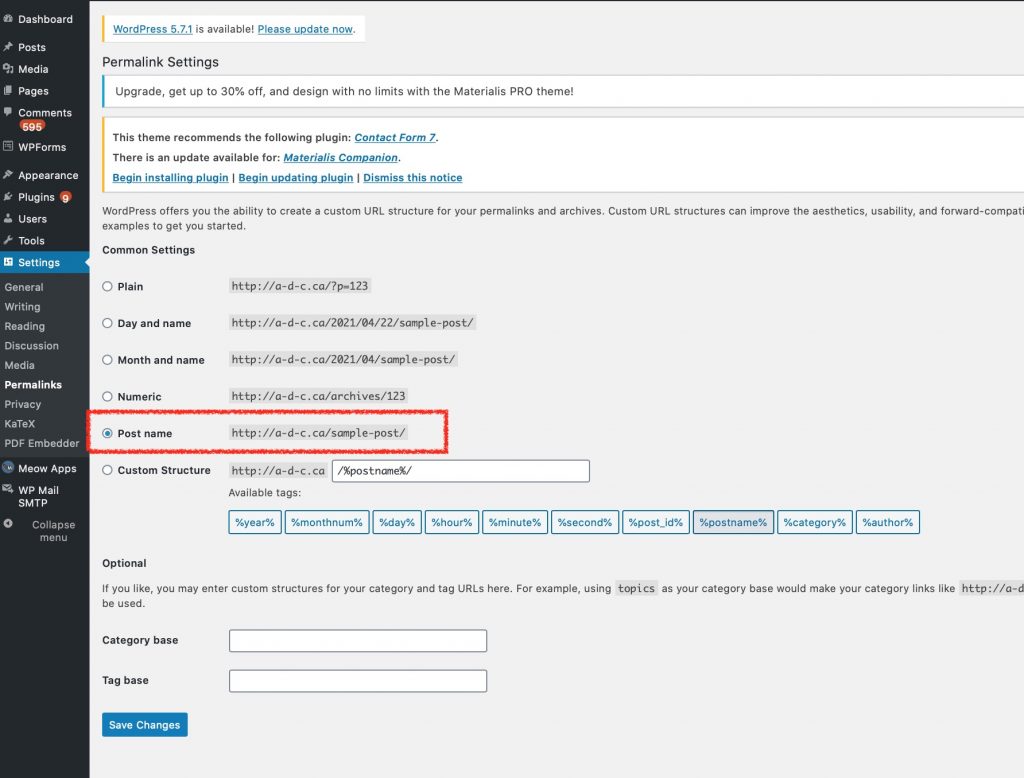
For my site, the post name is being used as the permalink style. If ones system is correctly setup, then simply clicking on ‘Save Changes’ will change the permalinks from that point onwards. Most of the time this is not the case and a few additional changes need to be made.
Changes to the webserver configuration file…
A key change needs to be made to the web server’s configuration file so that the .htaccess file is used instead of the default settings. Depending on the distribution used, the config file can httpd.conf, or apache2.conf, or even 000-default.conf. In the section for the site (i.e. in the <directory /var/[something] > section, the AllowOverride needs to be set to All; for example…
<Directory /var/www>
        Options Indexes FollowSymLinks MultiViews
        AllowOverride All
        Require all granted
</Directory>
Enabling rewrite mod…
Next, the rewrite module needs to be enabled in the web server. It does all the magic with changing permalink URLs. To list all the currently enabled webserver modules:
> sudo apache2ctl -M

- or -

> sudo /usr/sbin/apachectl -M
And if necessary, to enable the rewrite module (note that apache needs to be restarted if it is enabled):
sudo a2enmod rewriteChanges to the .htaccess file
The permalink page makes a suggestion of what should be put into the .htaccess file. This file should be located at the same level of the where the website is located (as in the apache.conf file). An example what wordpress suggests to be placed into the .htaccess file is listed below:
# BEGIN WordPress
# The directives (lines) between "BEGIN WordPress" and "END WordPress" are
# dynamically generated, and should only be modified via WordPress filters.
# Any changes to the directives between these markers will be overwritten.
<IfModule mod_rewrite.c>
RewriteEngine On
RewriteRule .* - [E=HTTP_AUTHORIZATION:%{HTTP:Authorization}]
RewriteBase /
RewriteRule ^index\.php$ - [L]
RewriteCond %{REQUEST_FILENAME} !-f
RewriteCond %{REQUEST_FILENAME} !-d
RewriteRule . /index.php [L]
</IfModule>

# END WordPress
WordPress Backups and Site Copying…
There are a few different ways to backup and even make copy a live site to a local machine. While there are quite a few different plugins and scripts out there, however it pretty simple to do it manually. To back up everything we need a copy of:
- everything within the wp_content directory; this includes themes, plugins, and uploads
- the wp-config.php file
- a dump of the mySQL database which all the posts, comments, and pages
To grab everything under the wp_content directory, the following command can be used (it doesn’t necessarily need to be executed as sudo):
> cd /var/www/html/
> sudo tar -zcvf wpContent.tar.gz wp-content
There are multiple ways to export the contents of the database. From the command line the mysqldump utility can be used to dump the database to a file.
> sudo mysqldump -u WORDPRESS_USER -p WORDPRESS_DB > WP_DB.sqlNote that if there is a PROCESS error, then the –no-tablespaces option should be supplied:
> sudo mysqldump -u WORDPRESS_USER -p WORDPRESS_DB --no-tablespaces > WP_DB.sqlSite Copying…
To migrate the WordPress site to another machine, the above steps needs to be done first then the following additional steps need to be done.
From the File menu in MySQLWorkbench, the dumped database needs to be imported either using the Open SQL Script… or Run SQL Script… commands. Note that with the Open SQL Script… command the allows one to view the script before it is executed.
Next, in the imported database, the following updates need to done so that WordPress points to the host. Note that this can be done in MySQLWorkbench.
UPDATE wp_options SET option_value = replace(option_value, 'http://OLD_DOMAIN', 'http://localhost') WHERE option_name = 'home' OR option_name = 'siteurl';
UPDATE wp_posts SET post_content = replace(post_content, 'http://OLD_DOMAIN', 'http://localhost');
UPDATE wp_postmeta SET meta_value = replace(meta_value,'http://OLD_DOMAIN','http://localhost');
Next on the local machine, WordPress needs to be downloaded to the appropriate directory. Then the wp_content directory can be overwritten with the tar.gz file created previously.
Finally, the wp-config.php file needs to be modified so that it has the correct details such as account name, password, and database name.
No Comments